400 Series hoses can be the easiest to assemble, just follow the instructions below for correct installation.
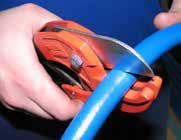
Step 1: Select the correct size hose for the fittings and measure to the desired length. This can be easily cut using Speedflow’s 400 Series cutters. Other acceptable means of cutting are: Sharp knife or blade. Make sure the cut is square and any residue is trimmed and cleaned.
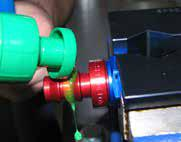
Step 2: Install the hose end in the vice jaws and secure. If you are assembling a angled fitting, use an adapter of the correct size in the vice jaws and screw the angled hose end to this, make sure it is tight. This allows you to use push the hose on without the hose end moving. Lubricate the tail, we use liquid soap as this will dry unlike oil or grease!
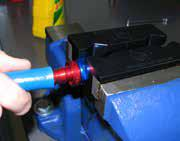
Step 3: Locate the hose on the end of the tail. With force push the hose. You will encounter resistance as the hose is pushed up the tail and over the barbs, try and do this in one motion until the hose is tight under the collar. The process can be made easier by sitting the hose in hot water for about 30 seconds before you start.
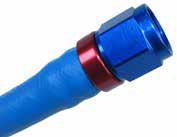
Step 4: Remove from the vice and repeat for the opposite end. Your completed hose is now ready to be installed on your vehicle, it is advised to clean, inspect and pressure test the assembly before using.